The Old Alignment Cues Just Don't Work
When I first began practicing yoga, every word that came out of my teacher's mouth was like gold. Every pose had a treasure chest of encrypted instructions to follow in order to access its power.
I needed to put my feet at very precise degrees to do standing poses like Triangle and Warrior I properly. I had to pay attention to minutiae like which toe the center of my kneecap lined up with in Warrior 2, and to know if my ears were in line with my upper arms in downdog.
And getting every cue down exactly as my teacher called them out kept me coming back for more. I tried and tried to "better" my practice by following each cue as best as I could, but some cues I just couldn't get down.
Little did I know — my body, with its unique bone structure and special quirks, simply couldn't do all that my teacher was asking it to do.
I felt stuck in my practice, until I began studying anatomy, biomechanics and kinesiology. Only then did I learn that many alignment rules in yoga were meant to be broken, or shouldn't even exist at all.
They just don't work for many people, including me.
And it's not just my teacher. There are literally thousands upon thousands of yoga teachers who give cues that are well-meaning, but fail to grasp the reality of human variation and movement mechanics. I gave most of these cues myself, for years, with full conviction.
The generalisation was simply made before anyone had good data on how much skeletons actually differ. We have that data now — the twist along the thigh bone alone varies by around 30 degrees between perfectly healthy adults, which is more than enough to make one instruction fit one person and misfit the next.
Here are 10 of the most common alignment and activation cues given by yoga teachers all over the world that, in my opinion, should be put to rest.
1. Tadasana: "Parallel Your Feet to the Outer Edges of the Mat"
Tadasana: Mountain Pose. Standing upright, feet on the floor, arms at the sides.
Tadasana is a cool pose, believe it or not!
I know it seems boring, but it actually gives us so much information about our hips, legs and feet. Once we understand our lower body in Tadasana, we have our body's unique blueprint for all of our standing poses.
Let me explain.
When we stand in our unique, neutral position, with our feet pointing in whatever direction is most natural to us, we put the least amount of stress — and possible wear and tear — on our muscles, joints and connective tissues.
For some of us, our feet will land parallel when we are in neutral. But for many of us, they won't. One or both feet might turn in towards the centerline of the body in a pigeon-toed position, bringing us into external rotation when we bring our feet parallel to the outer edges of the mat. Alternatively, one or both feet might point out to the sides, which would bring us into internal rotation when we parallel our feet. Mine point out. It took me about a decade to find that out, and another year to stop correcting it.
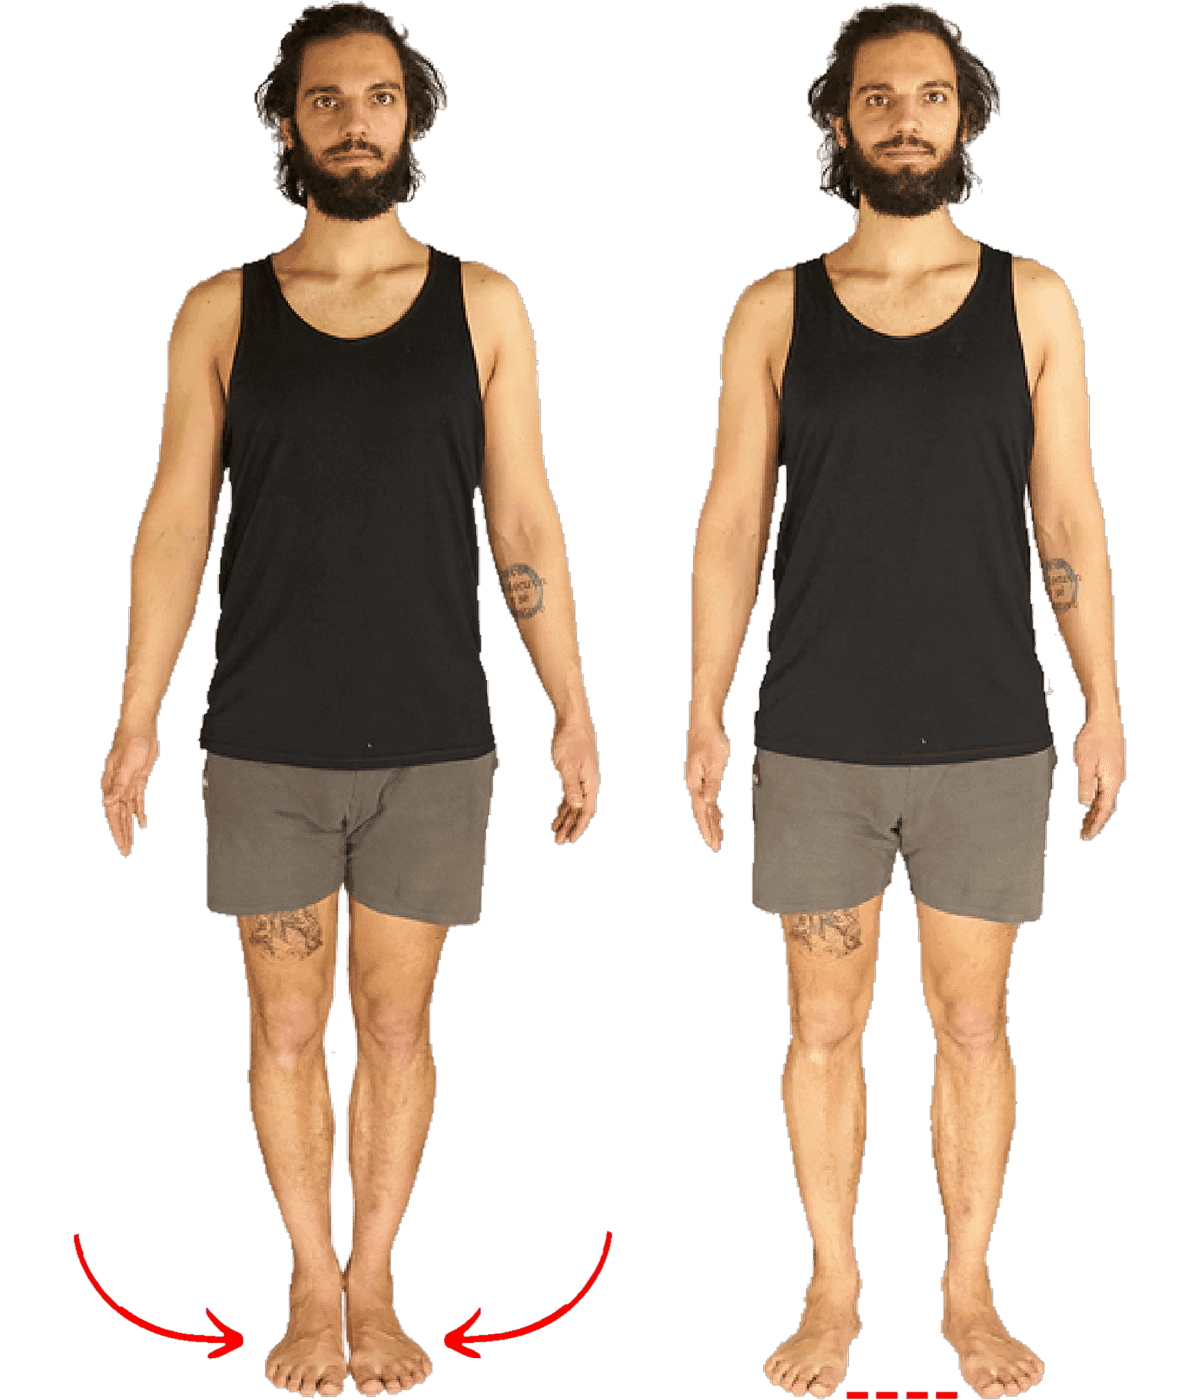
Left: the feet being wrangled into "parallel". Right: a foot left where it naturally lands.
Often this isn't happening at the hip at all.
External tibial torsion: a twist along the length of the shin bone that turns the foot outward regardless of what the hip is doing. Like every other torsion in the skeleton, the amount varies from person to person.
So if we consider the fact that the parallel feet cue is there to supposedly put us in an anatomically neutral position, we need to understand that our anatomical neutral is different from everyone else's — and different from our anatomy textbook's definition of neutral, too.
Furthermore, our neutral foot position should be taken into consideration in the rest of our practice beyond Tadasana. If our feet aren't completely parallel in our Mountain Pose, then they don't need to be in any of our other standing poses, either.
If your feet naturally want to turn out in Tadasana, then you can turn your front foot out in Warrior 2. You can turn your standing foot out in Tree Pose. You can turn the front foot out in Triangle and Side Angle and Half Moon, too.
Basically, the "feet parallel" cue is great for those whose natural alignment is feet parallel. But for the rest of us, we should find our own unique version of "parallel" — even if that means our toes point straight out to the sides in all of our standing poses.
2. Downward Dog: "Keep Your Hands and Feet Exactly Where They Are"
It's easy to say, "Keep your hands and feet where they are when you go from Plank to Downdog," but it doesn't feel right for many people. Why is that?
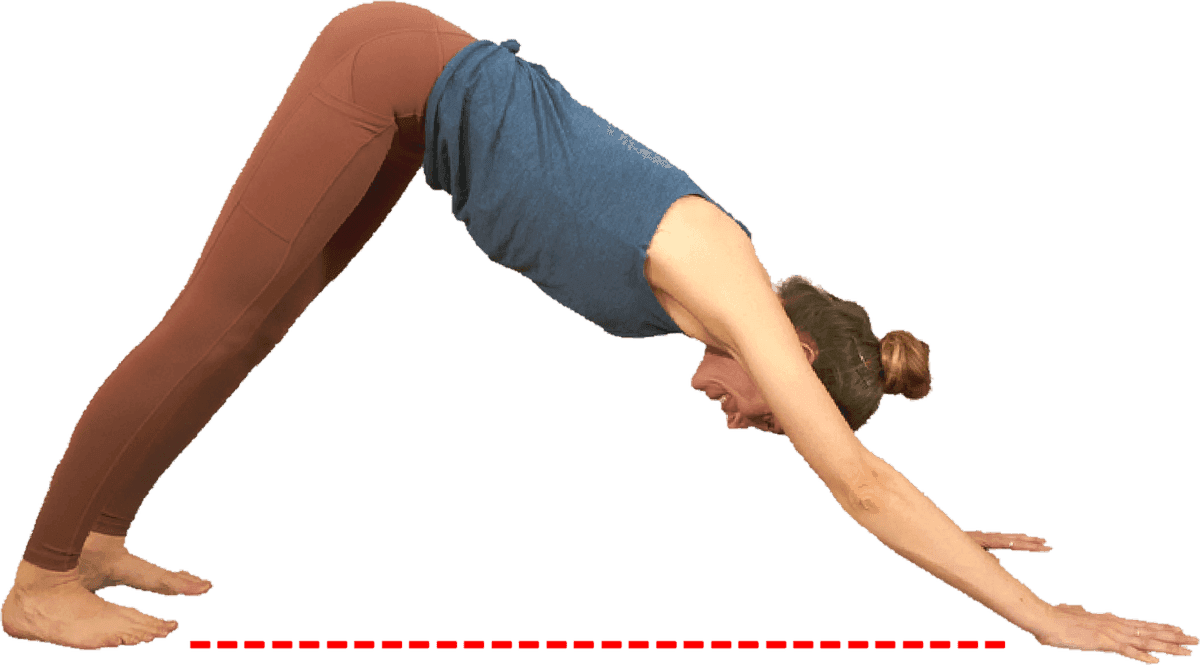
The distance the cue asks you to leave untouched.
Again, let's take a look at our unique body proportions.
In Plank Pose, the length of our arms doesn't affect the pose in any way. When you set yourself up in the pose and you feel stable, it doesn't matter if your arms are one foot long or three — it's the length of your torso and legs that determine the distance between your hands and feet.
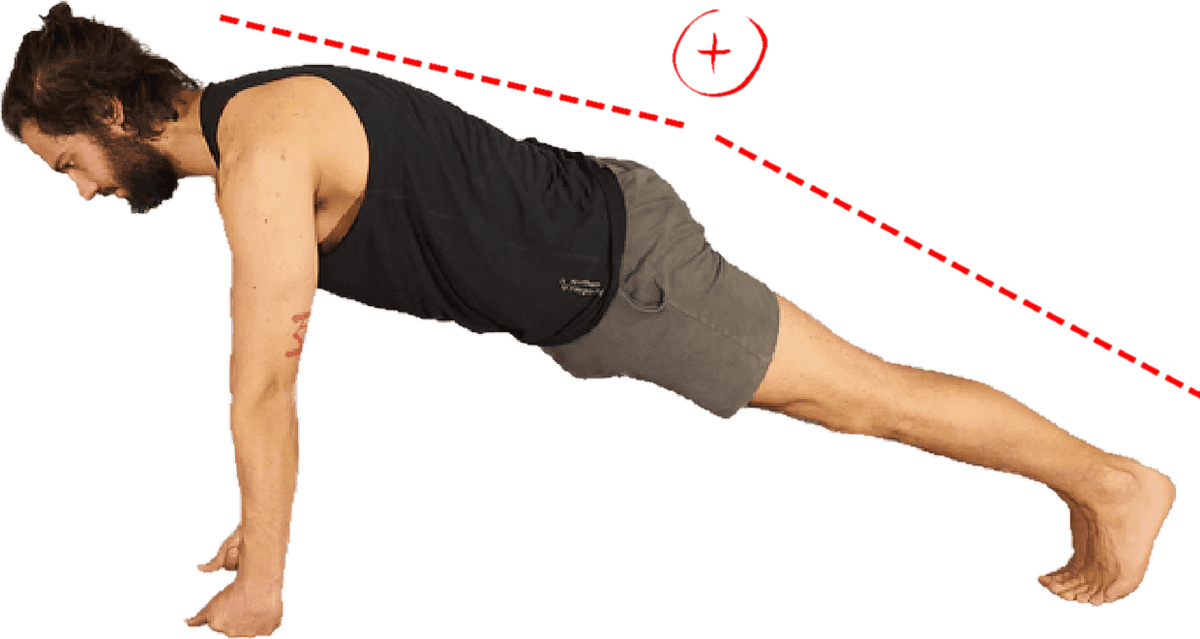
In Plank, your arms are a support. Torso and legs set the distance.
But when we come into Downward Dog, the length of our arms now plays a crucial role in how we set up the pose to feel stable and comfortable. Now our leg, torso and arm length are all key pieces of the puzzle.
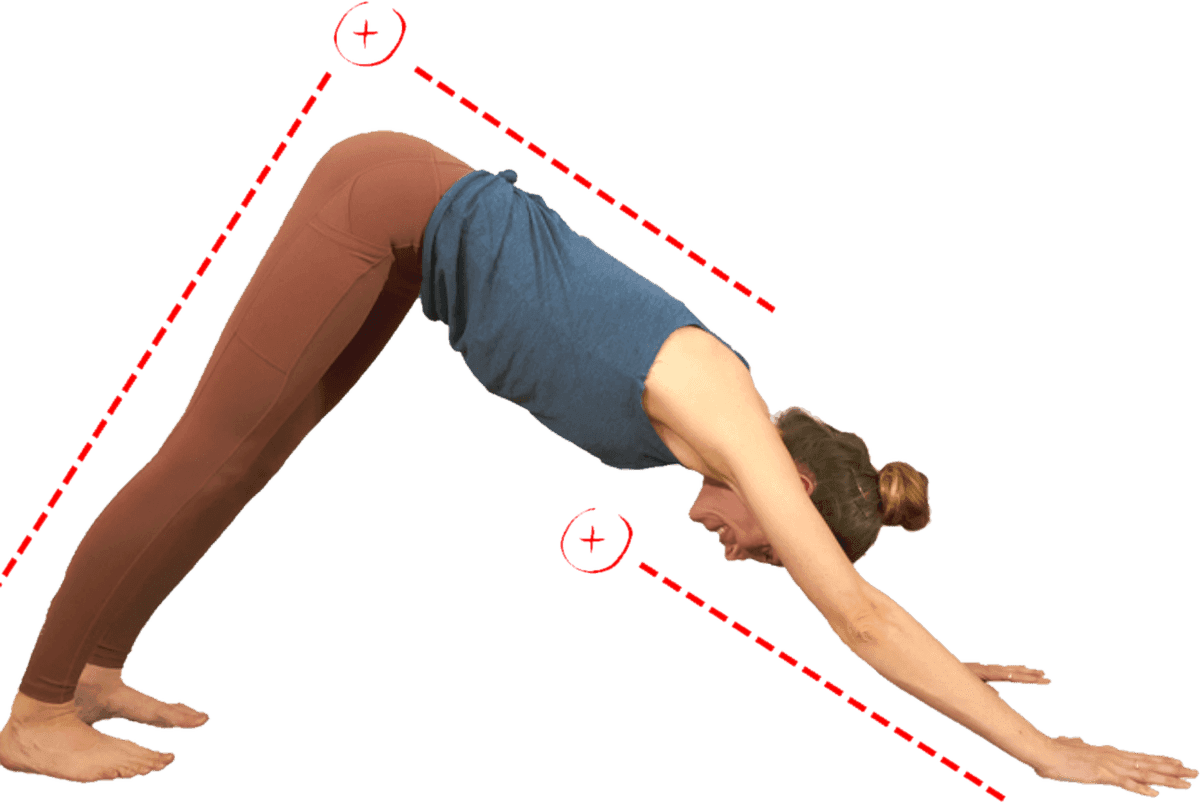
In Dog, all three lengths are suddenly part of the same triangle.
Let's visualize someone with short arms. When they follow the cue not to change the position of their hands and feet on the way from Plank to Dog, they might feel like their Dog is too long. This Dog would require extra muscular strength to hold, especially if they have a really long torso. Imagine their Down Dog looking like a wide, rolling hill. They want to walk their feet forward, but have been warned by their teacher not to do this, for reasons unknown to us all.
Conversely, when someone with long arms lifts their hips into Dog, especially if they have a short torso, now their hands and feet feel way too close together and the pose feels sticky. If they don't have the flexibility, they will have to round their low back or really deeply bend their knees, because the pose feels more like a Standing Forward Fold than a Dog for them. Imagine their pose looking like a really tall, skinny mountain with a high peak. They want to walk their feet back, but are scared to, in case they're scolded by their well-meaning yoga teacher with her outdated, cookie-cutter cues.
Here's a rough test I like to use with trainees to find out which one you are. Sit in Dandasana with the legs straight and the spine neutral, then put your hands on the floor beside your hips without leaning back to get there. Fingertips only, and your arms are short relative to your torso. Flat palms, and you're roughly proportional. Bent elbows, and your arms are long. It's not a measurement — it's a starting point.
The goal in Downward Dog was never a fixed hand position. It's to keep the spinal curves you have in Tadasana. If getting there means walking your hands forward or your feet in, that's not cheating. It's arithmetic. This is the same principle at work in how your arm anatomy determines hand placement across every weight-bearing pose.
3. Downward Dog: "Bring Your Ears in Line with Your Biceps"
The goal of this cue is great, and one that I completely love and agree with — to bring the head in line with the rest of the spine, so the spine is in neutral.
It's important that yogis know how to bring their head directly on top of their spine so they can recreate this feeling in challenging poses like Handstand and Headstand, as well as in daily life, where tech neck is alive and well.
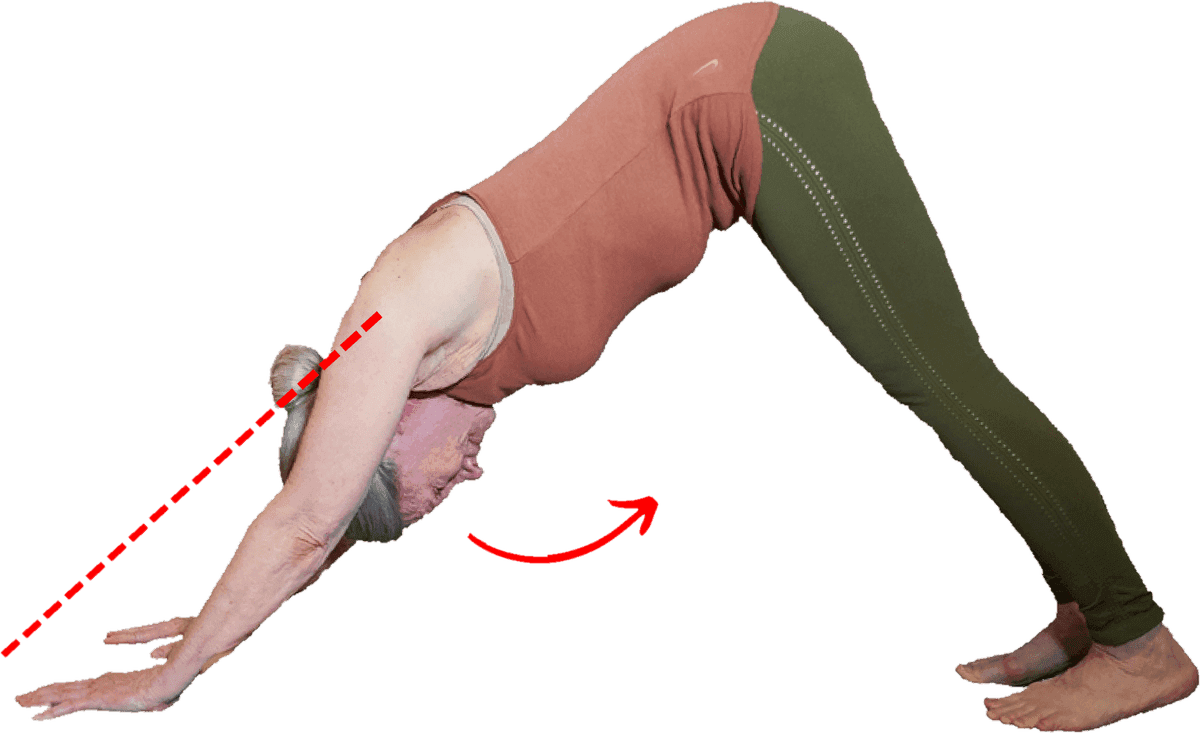
The cue as it's intended: ears in line with the upper arm bones, head neutral.
Unfortunately, this cue goes awry the minute a yogi steps onto the mat who can't raise their arms up fully perpendicular to the ground.
Try this. Stand in front of a mirror in Tadasana and lift your arms straight up. Where are your arms? Can you see them out of the corners of your eyes, or are they back far enough to be out of sight? When you turn profile to the mirror, are your arms completely perpendicular to the ground, or are they angled forward a bit?
(Hint — make sure to keep your lower ribs pulling down to keep your spine in neutral.)
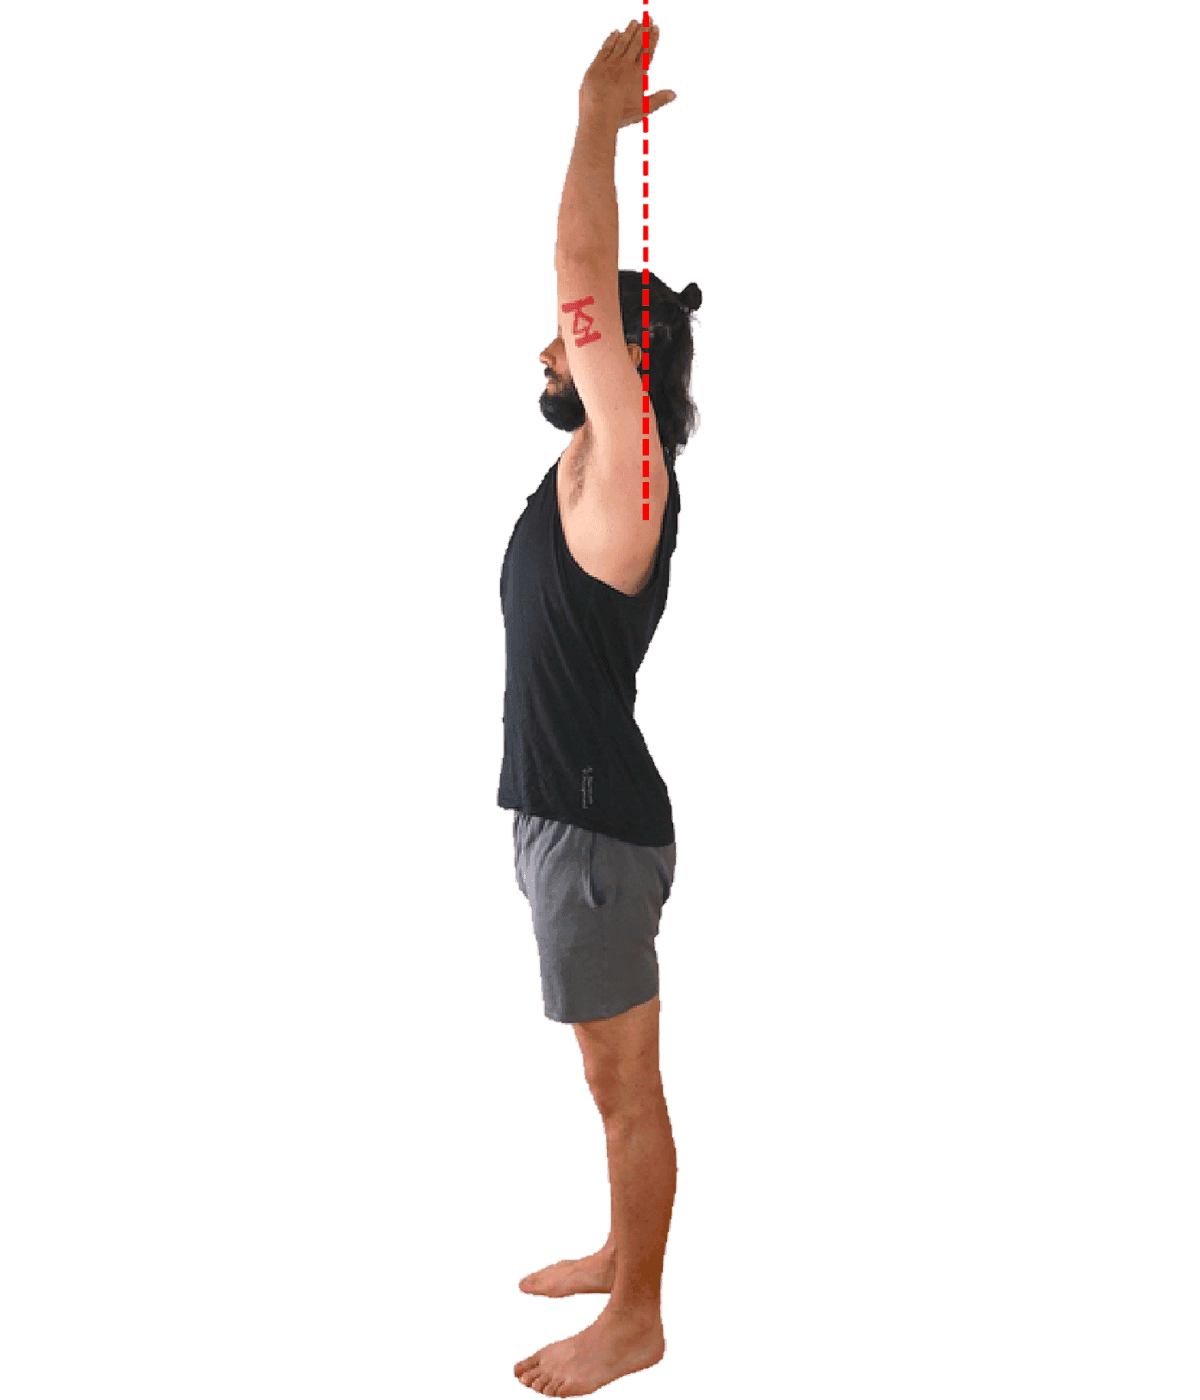
The mirror test in profile. Plenty of people stop short of that line, and always will.
Due to muscular tightness sometimes, and bone-on-bone compression in the shoulder joint more oftentimes, some people can't reach their arms up perpendicular to the floor. It's rarely just the shoulder joint, either: getting your arms to vertical draws on shoulder mobility, on how far the shoulder blade can rotate upward, and on how much extension is available in your upper back. Anything short in that chain and your arms stop somewhere in front of vertical, which is a perfectly ordinary place for them to stop.
So for these people, with their arms at a forward angle, what do they have to do in order to bring their ears in line with their upper arm bones?
That's right — since they can't bring their arms back far enough to line up with their ears, they have to bring their ears forward to their arms. This means they jut their head forward, going into the tech-neck shape that we try so hard in yoga to realign.
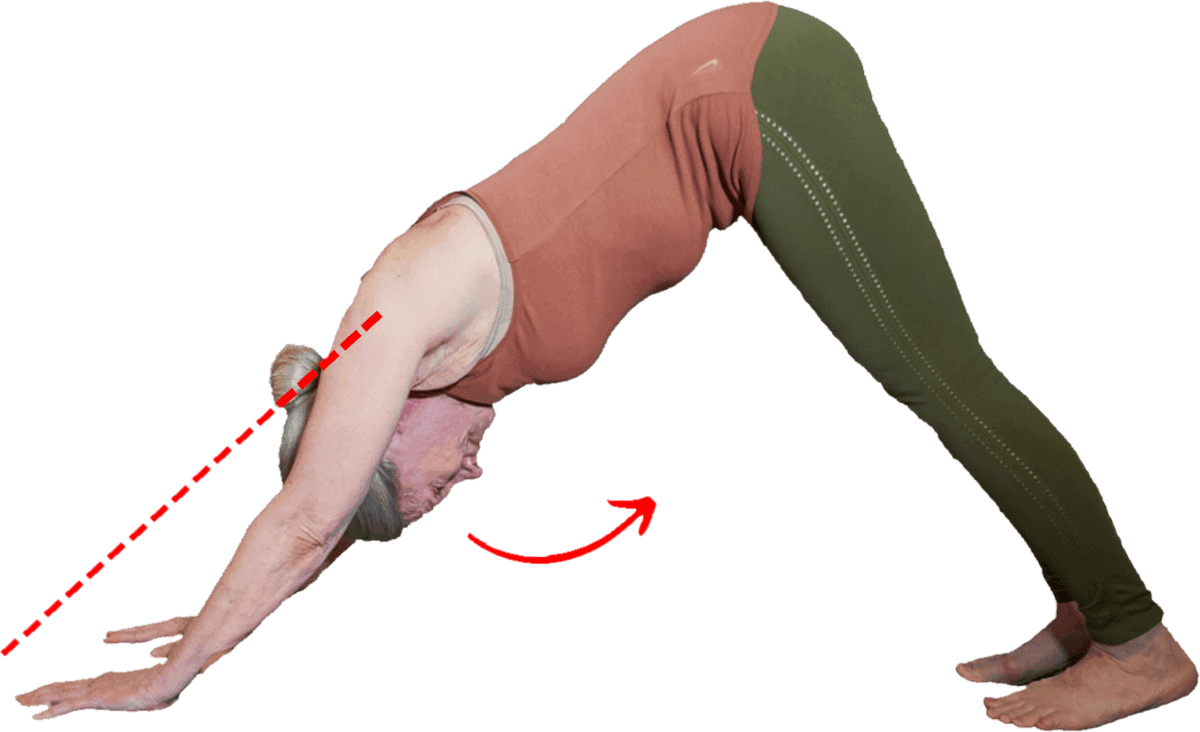
What the cue actually produces when the arms can't get there: the exact shape we're trying to undo.
And though this example is done standing in Mountain Pose, the same concepts apply when we flip upside down in Downward Dog.
I cued this for years without once looking to see who in the room could actually do it. Ignore this cue if you have to bring your head forward in order to achieve it. Your arms were never the reference point your neck should be using.
4. Warrior 2: "Center Your Kneecap in Line with Your Second Toe"
This cue requires a keen eye and possibly even a yardstick to get right!
I like to imagine BKS Iyengar, the teacher credited for this cue, getting out his box of measuring tools to make sure the kneecap is indeed in line with the second toe of the front foot, and not a millimeter out of place.
As with most of the other cues in this list, the goal is safety and protection of the connective tissues in the joints. Bringing the knee in line with the second toe supposedly brings the leg and knee into perfect neutral — perfect alignment, which is good for the knee joint. That's great. We all want perfect alignment and healthy knees! And if you look at images of skeletons in anatomy books, you might think this cue would work for everyone.
But using a keen eye in Tadasana, we can see that we all have differently shaped legs. Our neutral is unique, and none of us looks exactly like the anatomy-book skeleton.
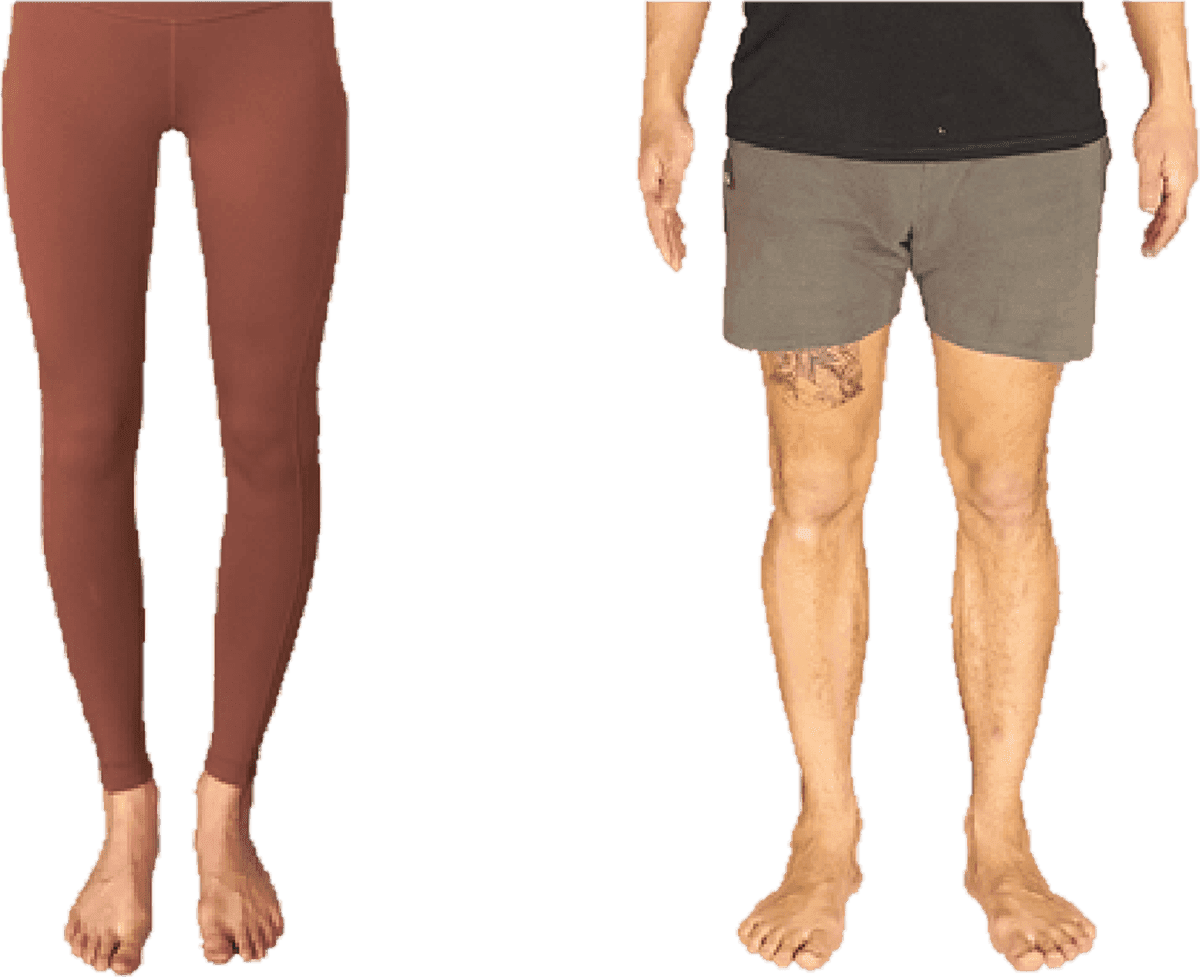
Two people, both standing in their own neutral.
If we all had exactly the same bones, we could invent all sorts of incredibly precise cues like this one that would help protect our knee joint from misaligning in one direction or the other. But we know that we are not all the same, so this cue doesn't work to align every student. In fact, it misaligns many students.
We can look at the faces of 10 different people and see that our noses are all different shapes and sizes and locations on our face. We can see that our cheekbones look different, and that our ears are in different places on our heads. We can see that our foreheads are different sizes and our chins stick out in many different kinds of ways. Even our teeth look completely different.
And although it's not as obvious when we're talking about bones that are covered by thick muscles in other parts of the body, the same amount of difference between us is there as well.
So let's take a quick look at why this cue doesn't work for everyone whose legs aren't perfectly straight.
Have you heard of the term "bow-legged"? This refers to someone whose knees don't touch together when the ankles are touching in Tadasana. The opposite is someone whose knees touch together when their ankles don't, also known, more colloquially, as being "knock-kneed."
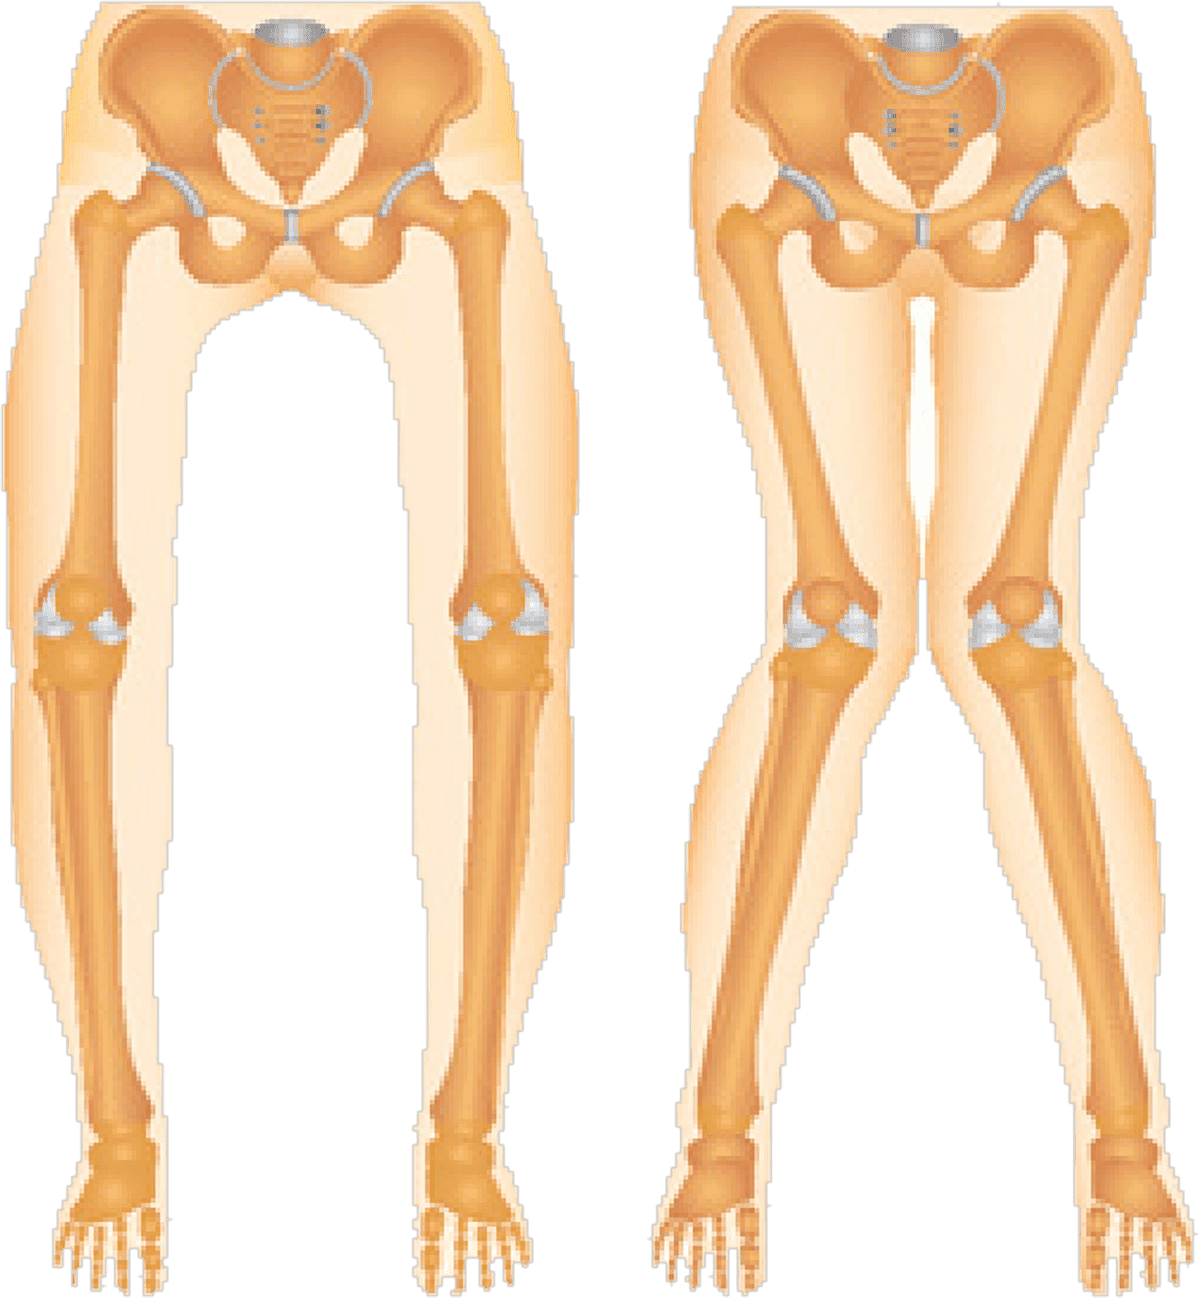
Bow-legged on the left, knock-kneed on the right. Neither is a fault to be corrected.
For these two people, their knees are not straight down from their hips, and not directly over their ankles, like we see in anatomy book skeletons.
This means that in order for them to maintain their natural anatomical neutral in Warrior 2, their front knee will have to drift out to the side a bit, for the bow-legged person, or drift in towards the midline a bit, for the knock-kneed person.
If the bow-legged person were to follow the cue and bring the center of their kneecap in line with their second toe, they would have to roll onto the inner edge of their front foot, collapsing their arch — this is not at all what we want to do. If the knock-kneed person were to follow the cue, they would roll onto the outer edge of their foot — also not what we want them to do!
What's important in the front leg in Warrior 2 is that the foot stays in neutral, with all edges of the foot touching the mat and the arches lifted, and that the knee is in its own unique anatomical neutral when it is bent.
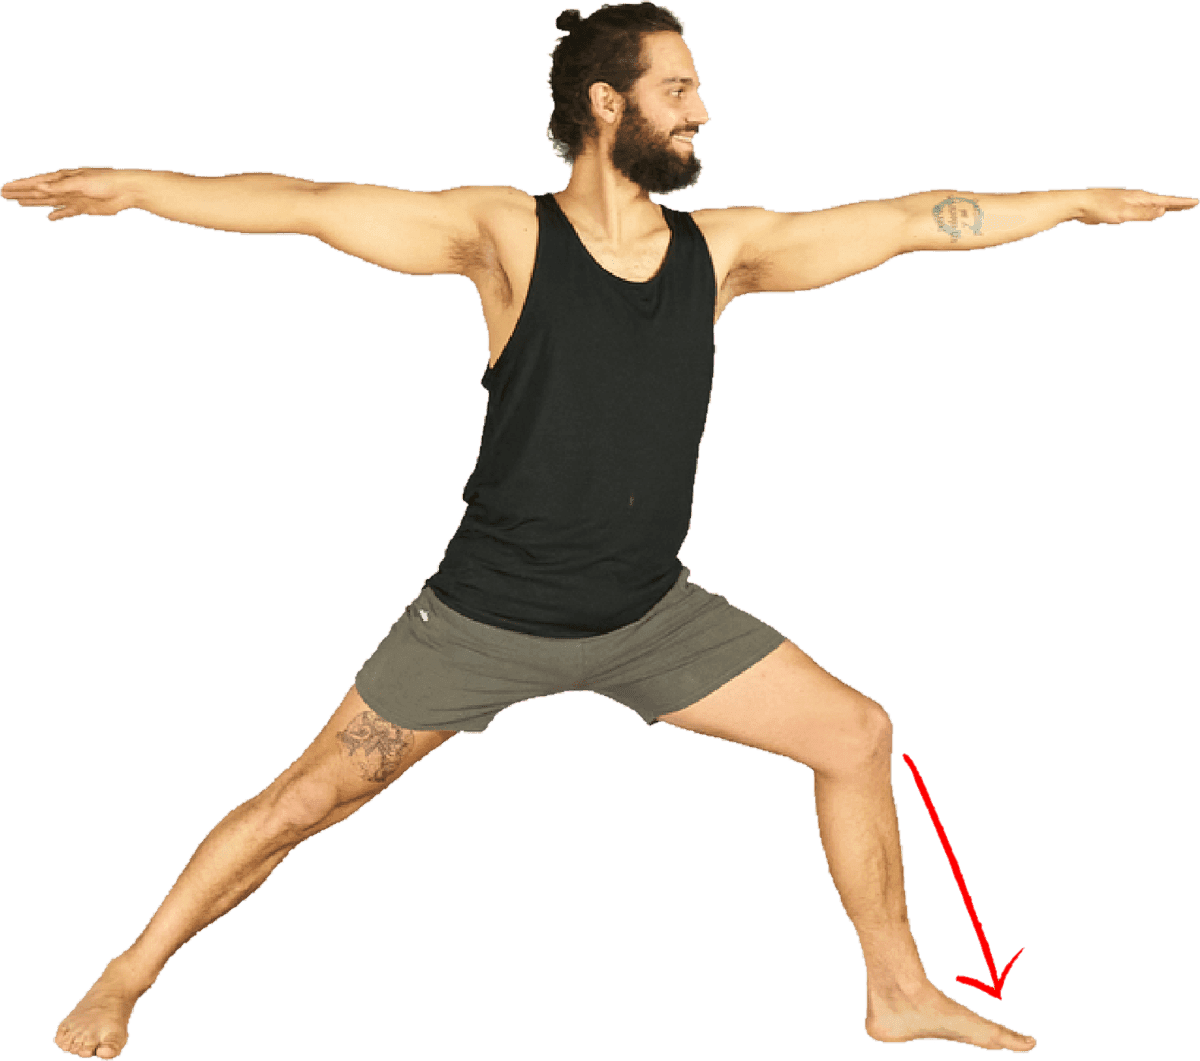
Let the knee find its own line. The foot is the thing to keep honest.
5. Urdhva Hastasana: "Lower Your Shoulder Blades Down Away from Your Ears"
Urdhva Hastasana: Upward Salute. Standing with the arms reaching overhead.
This cue to drop the shoulders down away from the ears can be heard in poses like Tadasana with the arms up, High Lunge and Low Lunge, Warrior I — and really any time we reach the arms overhead in yoga.
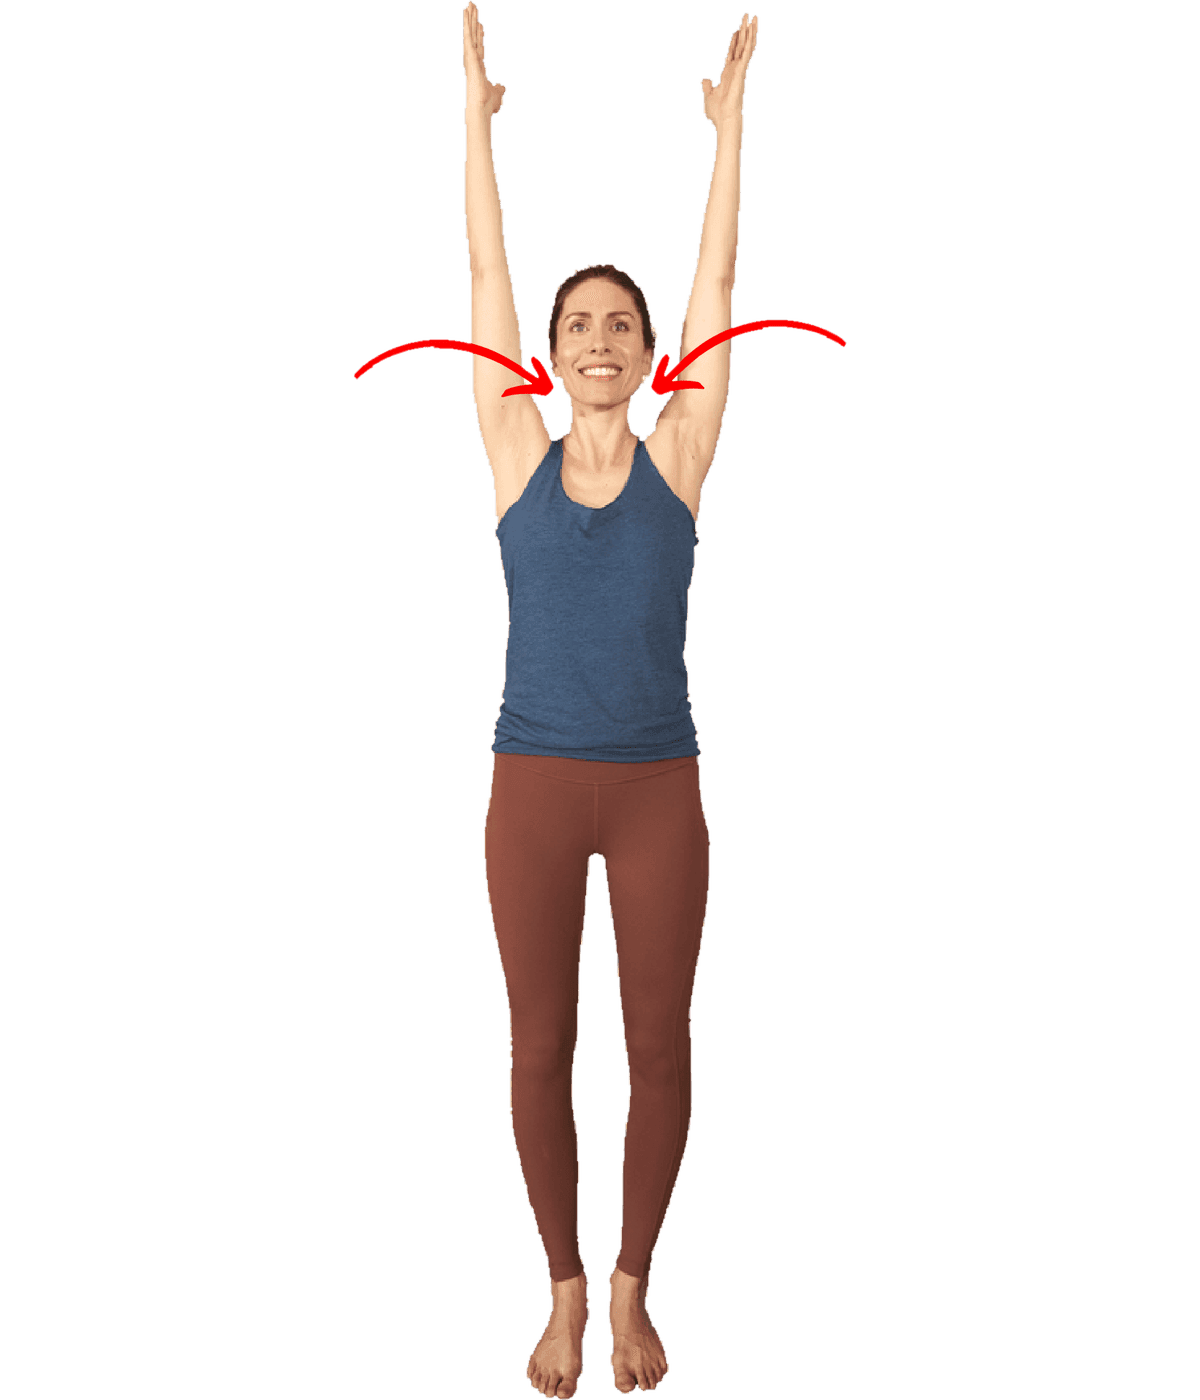
The cue in action: the shoulder blades dragged down at exactly the moment they're needed most.
Like all of these cues on the list, the intention behind it is a good one: to take tension and tightness out of the neck and upper shoulders.
But in reality, even though we might look like we're tensing and tightening our upper back muscles when we reach up, the truth is that we want those muscles to contract and jump into action, since they were created to do exactly what we are doing — lifting the arms overhead.
When yoga became really popular, teachers around the world were confronted by students complaining of upper back and lower neck pain. (Google the upper trapezius muscle and you will see what I'm referring to.) There is no other time in the practice when the upper back and neck muscles look more tight and tense than when our arms are up.
This looks counter-productive to stress-free shoulders, but it's actually not.
When we reach the arms up and lower the shoulder blades down, the neck appears longer, and the upper shoulders appear to be relaxed, soft and spacious. Ahhhh… finally our neck pain is gone! Right?
Except what actually happens is that we go against nature, and our body's own intelligent biomechanics.
Here's what the shoulder blade is supposed to be doing. Below about 30 degrees of arm lift, it barely participates. But once the arm gets above shoulder height, the shoulder blade is supplying more than half the movement. So the muscles that look so tense up there are not misbehaving — they are doing the majority of the job.
The cue asks students to hold still the part of the shoulder doing most of the work, at exactly the point where it's doing most of the work. The muscles that were made specifically for lifting the arms overhead are now being forced to deactivate, leaving the wrong muscles to do the work instead.
So in arms-over-the-head poses, and in all other poses in yoga, it's best to work with the body's natural alignment and movement patterns rather than against them.
Let your shoulders lift!
6. Prasarita Padottanasana C: "Press Your Wrists Together"
This cue goes for all poses where we clasp the hands behind the back.
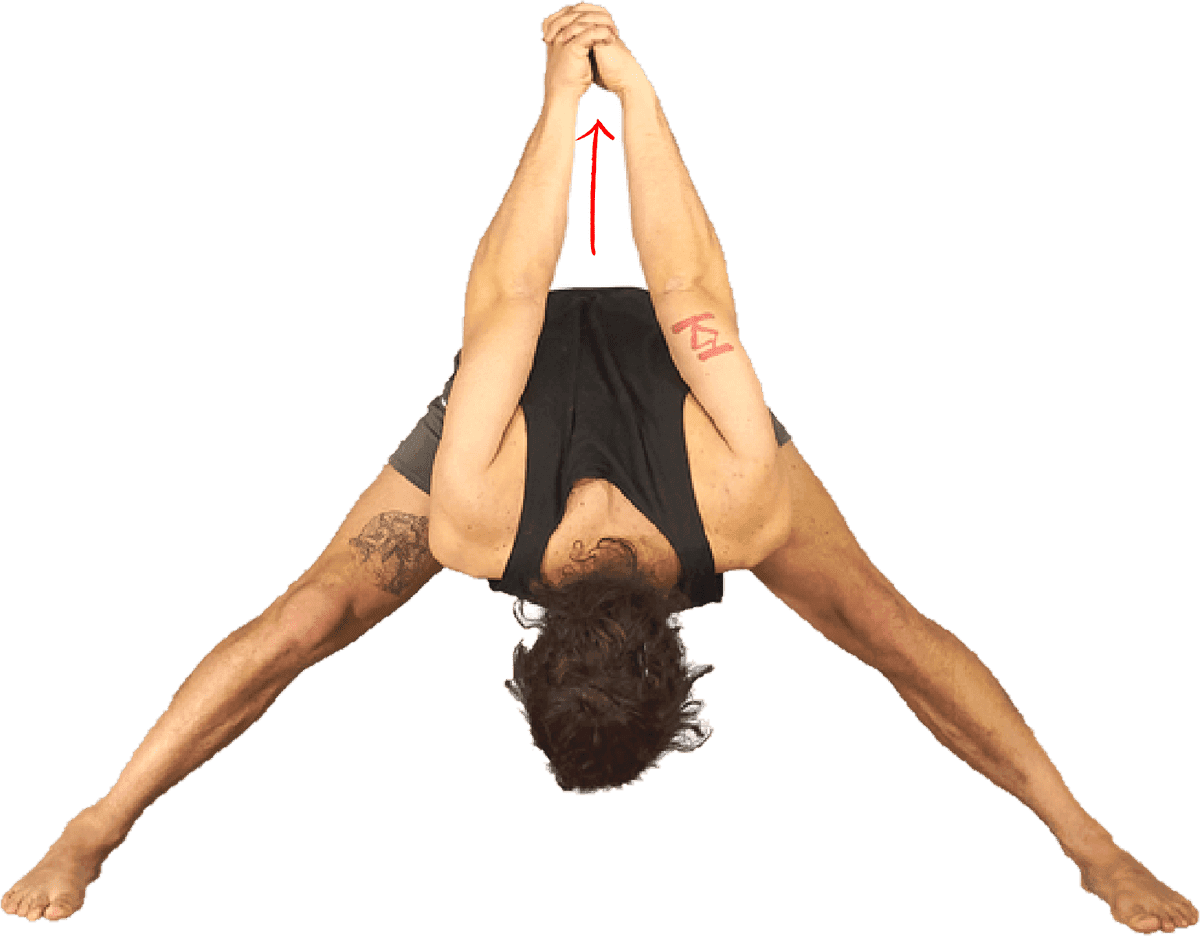
The shape the cue is usually attached to.
Why is it so important for us to press the palms together? I always wondered this as I struggled, in vain, to press my wrists together.
The intention behind the cue is to keep the wrists in neutral in order to protect them as we lift them up and overhead behind us. But in reality, there are a couple of reasons why this cue is overly cautious and doesn't work for many people.
First, it's worth asking whether the wrists really need to be protected in this pose at all. Are we bearing weight in our hands? No. So it's very highly unlikely that we will stress our wrists' connective tissues in any sort of injurious way just by clasping the hands together.
Second, unique bone structure plays a huge role in whether or not this cue will work for us. And it's not about the wrists — it goes all the way up to the shoulder, where every one of us has differently shaped bones.
Taking your hands behind your back is shoulder extension with internal rotation, and how far that goes has a lot to do with the amount of twist built into your upper arm bone.
Humeral retroversion: the amount of backward twist along the length of the upper arm bone. It varies between people, it varies between your own two arms, and it is fixed by adulthood.
For the anatomy geeks in the room, feel free to do a quick image search for "humeral torsion" and you'll see how differently two of these bones can be built. It even explains why so many people find this so much easier on one side than the other.
What this means is that some people are able to cross their arms behind their back really easily, and even give themselves a backwards hug, while others will never be able to bring the heels of their hands together behind their back.
It's not a matter of laziness, or lack of flexibility. It's that some people's bones simply stop them before they get there. And no amount of stretching will ever change this — stretching does not reshape bone.
So remember: if you can't press the heels of your hands together when you clasp your hands behind your back, it doesn't make you any less yogic.
It might just be your bones! Take a strap.
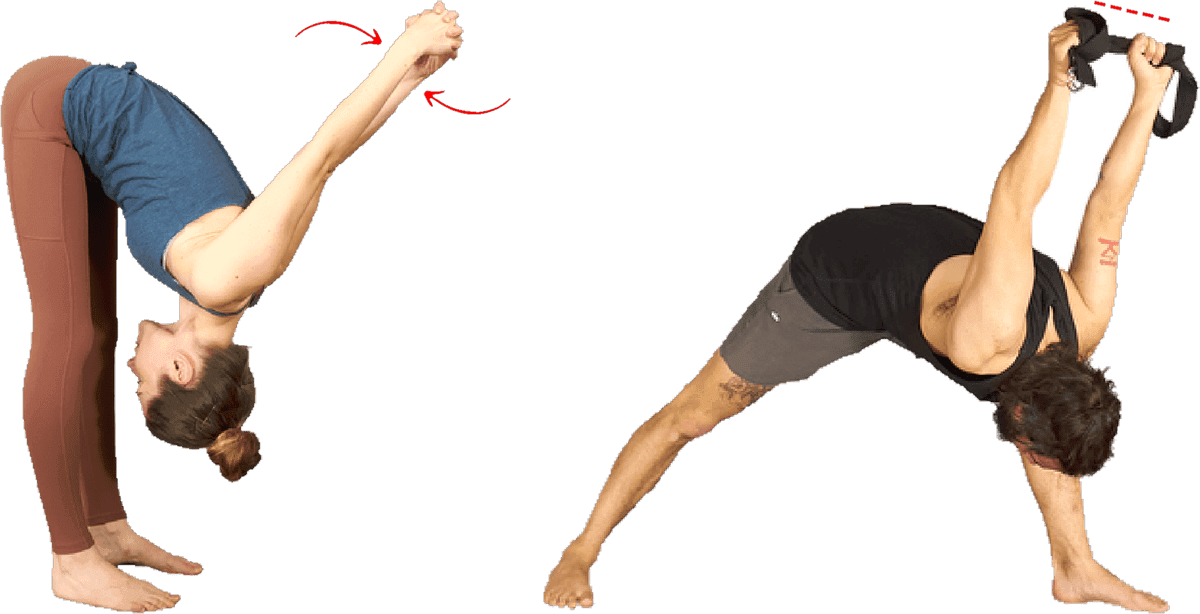
Left: the wrists being asked to do something the shoulders won't allow. Right: the same pose, with a strap doing the arguing.
7. Pigeon: "Parallel Your Front Shin to the Top of the Mat"
This cue takes the cake for top cue to ignore.
I can't tell you how many times I've been in yoga classes and heard this cue called out by the teacher, then looked around sympathetically and watched as most of the class gritted their teeth, held their breath and wrangled their shins forward with their hands as far as they could, even as their knees cried out desperately for help.
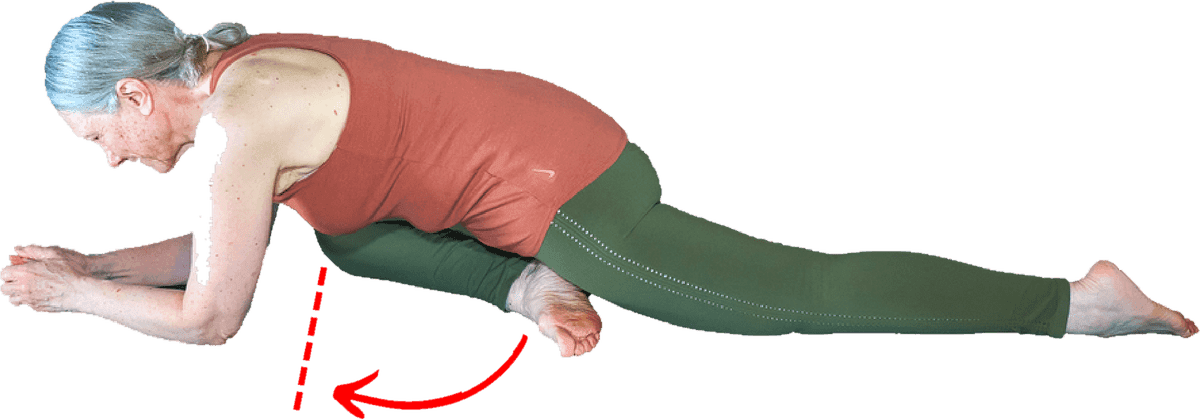
The direction everybody is straining towards. For most hips, it isn't available.
Why do so many of us struggle to get our front shin parallel to the top of the mat? Are we all lacking discipline? Are we all brand new to yoga? Does every single one of us have tight hips?
No, of course not. But still, in a yoga class of 30 people, you are likely to encounter only one person who can actually pull this cue off comfortably.
Let's take a moment and look at the science behind the deep amount of hip opening this cue asks of us.
There are two reasons why hip openers aren't as deep as we might like them to be: tight muscles around the hips, or bone-on-bone contact deep in the hip joint, which stops further hip-opening movement. The first can change. The second cannot, and the second is common.
Bone-on-bone compression: the point where two bones make contact and the joint simply stops. Unlike a muscular stretch, there is no working with it. It is information, not a limitation to overcome.
When we can't reach that magic parallel position with our shin in Pigeon, but we push through and try to achieve the cue anyway, it's our knee that takes the beating. The rotation we're asking for is supposed to be happening at the hip. If the hip has run out of room and we keep going, the twist has to come from somewhere — and the joint sitting right below it is the knee.
If there are no forces stopping you from bringing your shin to that position, then it's all good and fine, and there's no reason not to do the pose like this. But for most of us, either due to tight muscles or due to bone-on-bone compression, this magic angle in the front leg will never be achievable.
So flex the front foot strongly. That's the single most useful thing you can do here, because it stops the rotation from happening at the knee and keeps it where it belongs, in the hip. If you feel torquing in the knee anyway, flex harder. If it persists, come out.
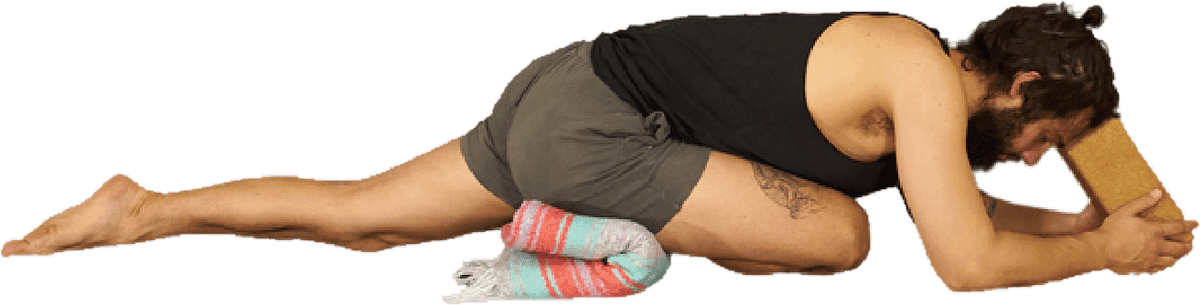
A block under the hip does more for this pose than any amount of shin-wrangling.
And if your shin sits at 45 degrees, leave it there. The therapeutic value of Pigeon has nothing to do with the angle of your shin, which becomes obvious the moment you meet the same shape in a yin class and notice how differently the same pose behaves.
8. Warrior I: "Square Your Hips to the Front of the Mat"
In Warrior I, the back foot is commonly cued to be set up at a 45 degree angle. And while I find this cue a bit nit-picky and specific — again, cue the box of rulers and other measuring devices! — there's another cue in this pose that is even more problematic: squaring the hips to the front of the mat with our back foot at 45 degrees.
Let's take a look at the action of the hip attached to the back leg in the pose.
When we point our toes out to 45 degrees, we bring our leg into external rotation at the hip joint. This is all fine and well, until we then get the cue to square our hips to the front of the mat, which rotates our pelvis on top of that same thigh bone in the opposite direction.
What does that mean?
Well, it means that our lower leg is going one way and our upper leg is going the other. And what joint is in the middle of this push and pull? That's right — the knee.
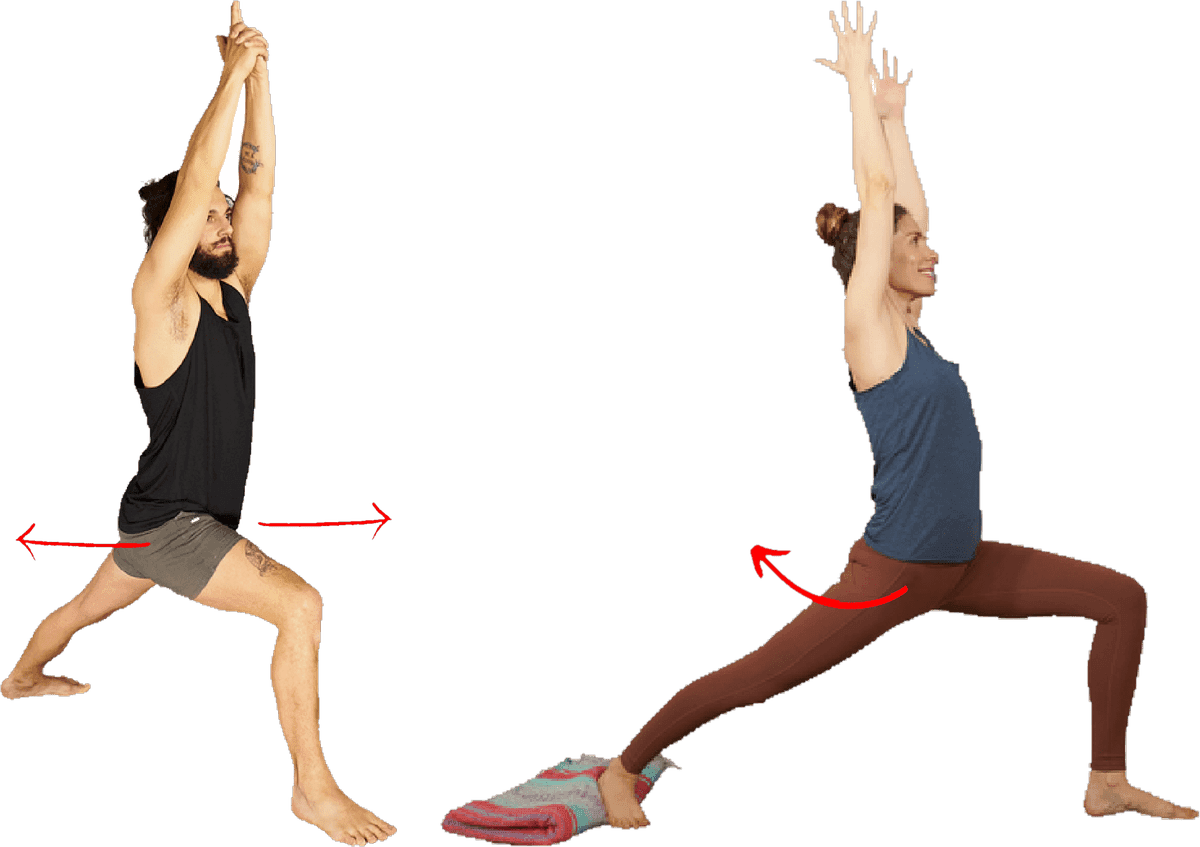
Two instructions, two directions, one knee caught between them.
Our poor knees, yet again taking an unintentional beating in our yoga practice.
Now, for most people, most of the time, this won't ever pose a problem, and bodies tolerate a great deal. But if you're doing it several times a week for years, actively muscling the pelvis around each time, you're loading the same connective tissue in the same direction over and over. It's an odd thing to keep doing for a shape.
So what can we do instead?
First, you can still do your Warrior I, but keep your hips open rather than closed — it costs the pose nothing that matters. Or step the back foot further out to the side than the traditional heel-to-heel line, which lets the pelvis come closer to level while the back leg stays comfortable.
And especially if you feel pulling or twisting in your back knee, take High Lunge. It's such an easy way to modify without interrupting the flow of your Sun Salutes, while keeping your knees happy.
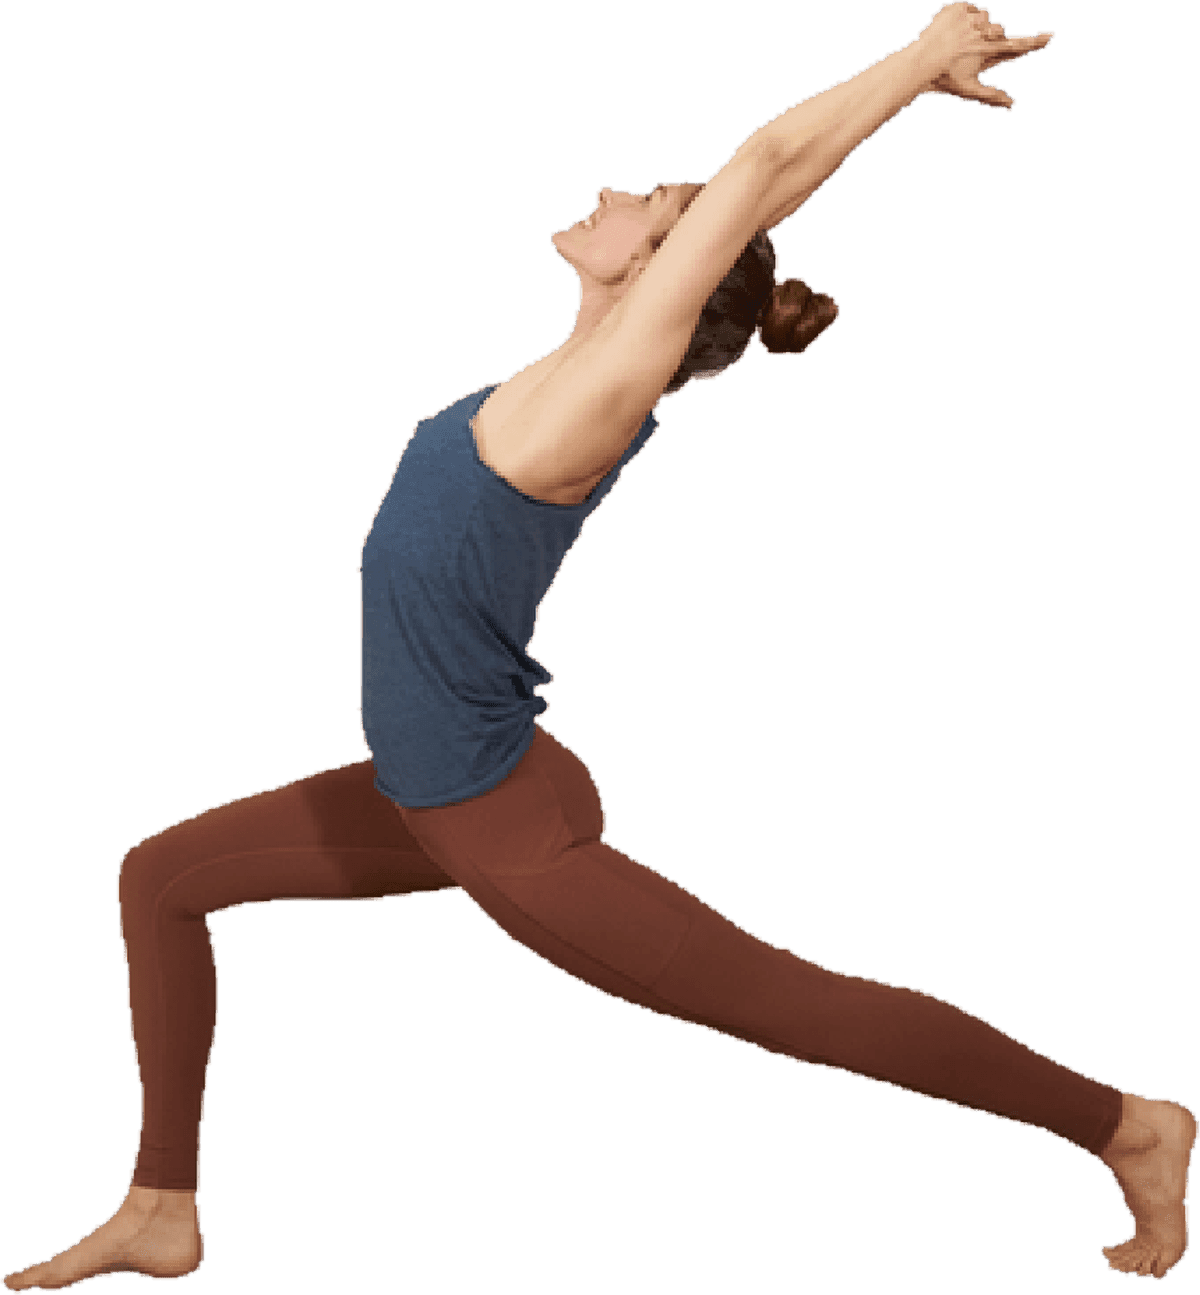
High Lunge. Back heel up, and the whole argument disappears.
There are plenty of creative Low Lunge variations if you want to make something of it.
9. Shoulderstand: "Come into Shoulderstand"
This cue made it onto my top-10 list of cues to ignore not because of any special alignment cues that are misguided, but because the pose itself is cause for concern.
Salamba Sarvangasana: Supported Shoulderstand. The body inverted and vertical, weight on the shoulders and upper arms, chin drawn toward the chest.
When we look at the mechanics of Shoulderstand — and also Plow Pose, which has the same basic shape — we see a few worrying things happening in the body. Namely, the chin is tucked deeply into the chest, causing the neck to go into deep flexion, and then we've got the weight of most of the body pressing down on it.
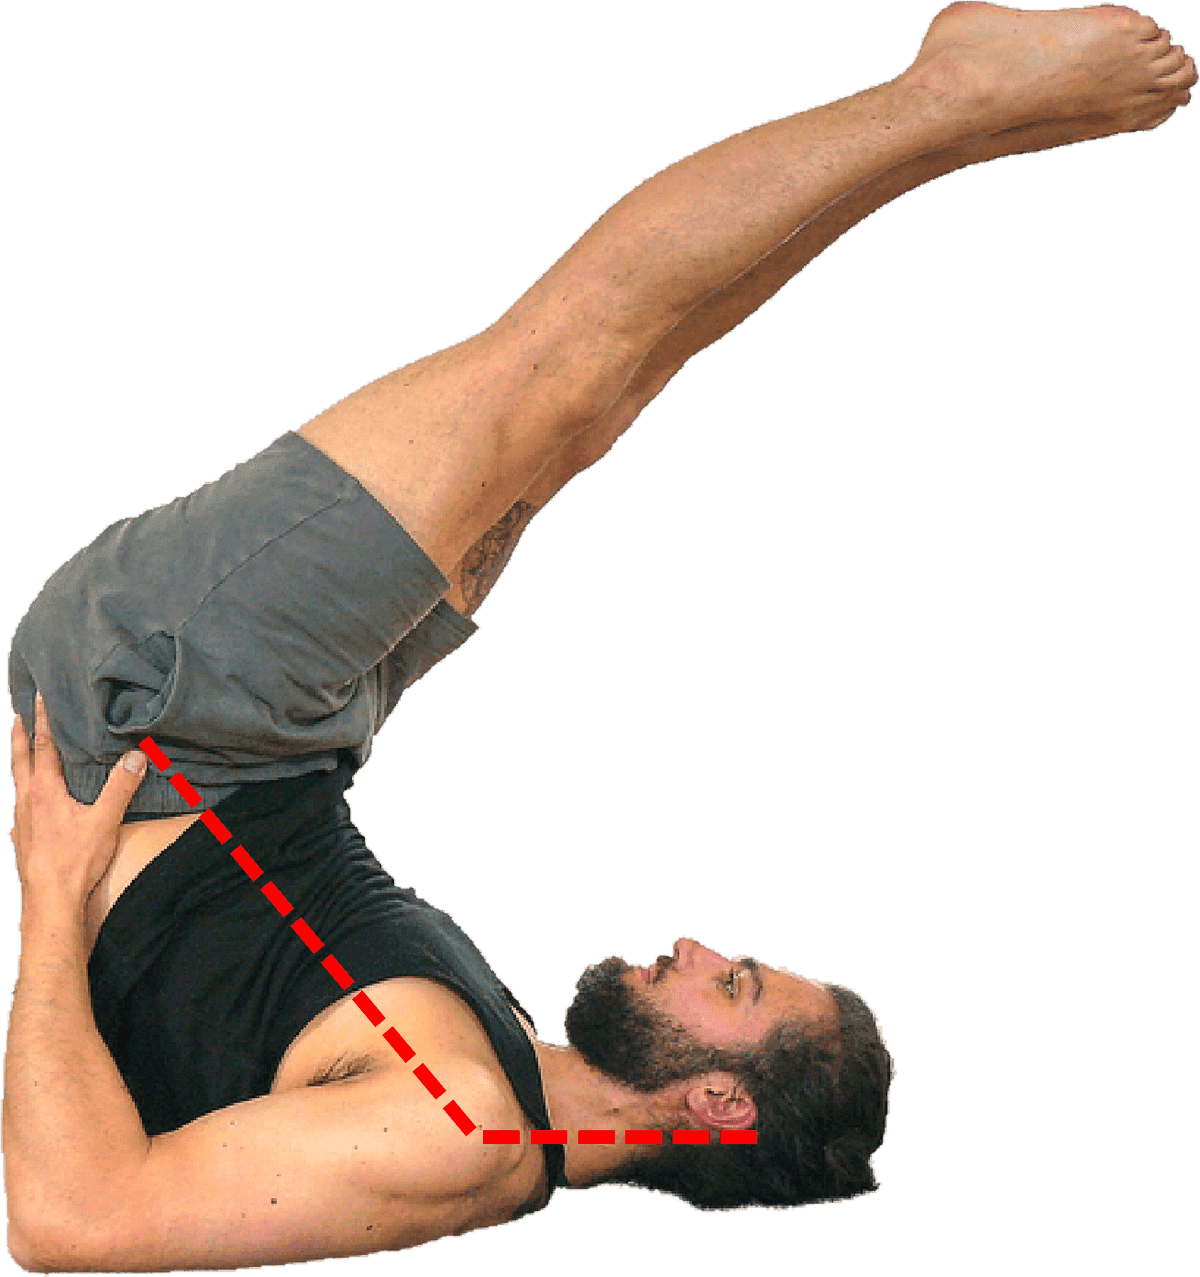
The smallest vertebrae in the spine, at their furthest from neutral, holding up the rest of you.
So let's talk about the chin tuck.
One golden rule of protecting the spine and keeping it healthy is this: any time we place a lot of load on the spine — the weight of the body, in this case — it should be in a neutral position. So the spine should not be in a twist, not in a side bend, not in a backbend, and not in a forward fold, which is what we have in Shoulderstand.
With the chin strongly tucked in and the weight of the body on the neck, we have an immense amount of load on the smallest, most delicate section of the spine, in a position very far away from its neutral.
The second issue is the shoulder blades.
If we forget to, or don't understand how to, draw the shoulder blades towards each other in the pose, it means that our body weight lands on the spine again — now a bit lower than the neck, in the upper thoracic spine. When we do draw the shoulder blades together, they lift the spine away from the floor, taking some of the pressure off the vertebrae and discs in this part of the spine. But this cue often gets left out, and when it does, the load lands squarely on bone.
(This is a different action from the one I objected to in cue five. Squeezing the shoulder blades toward each other is retraction. Dragging them down toward your waistband while your arms are up is depression. The first is doing real work here. The second was never doing any.)
Do it once and nothing happens. But over time, with repeated load placed upon the spine when it is out of neutral, this is a mechanism I don't much like — and there are easier ways to get what the pose offers. I don't teach it any more, and I'd be especially reluctant with anyone who has osteoporosis, where the combination of spinal flexion and load is a genuinely poor idea.
Legs Up the Wall won't invert you the way Shoulderstand does, and if what you want is the full inversion, then it isn't a substitute. But it will quiet your nervous system just as thoroughly, and it asks nothing at all of your neck.
10. Mula Bandha: "Engage Your Pelvic Floor"
This cue, similar to Shoulderstand above, is on my "ignore this cue" list not because of any outdated alignment ideal, but because I question that we should be doing this move very often — if ever, for some people.
Mula Bandha: root lock. Drawing the pelvic floor muscles up and in toward the centre of the body.
The energetic intention behind this cue goes back a few hundred, maybe even a thousand years. Engaging Mula Bandha is meant to hold our body's prana — its vital energy — inside the body, rather than letting it escape down and out through our lower orifices. Holding onto and building energy in the body has been a goal of the practice ever since Hatha Yoga was created.
But there are many ways of bringing energy to the body. And over time, what was an energetic practice turned into a postural one, so that now, in some styles, it gets cued in pose after pose after pose.
In physical terms, engaging Mula Bandha means engaging the complex hammock of our pelvic floor muscles and lifting them up and in towards the center of the body. This action is pretty much the same thing as doing a Kegel.
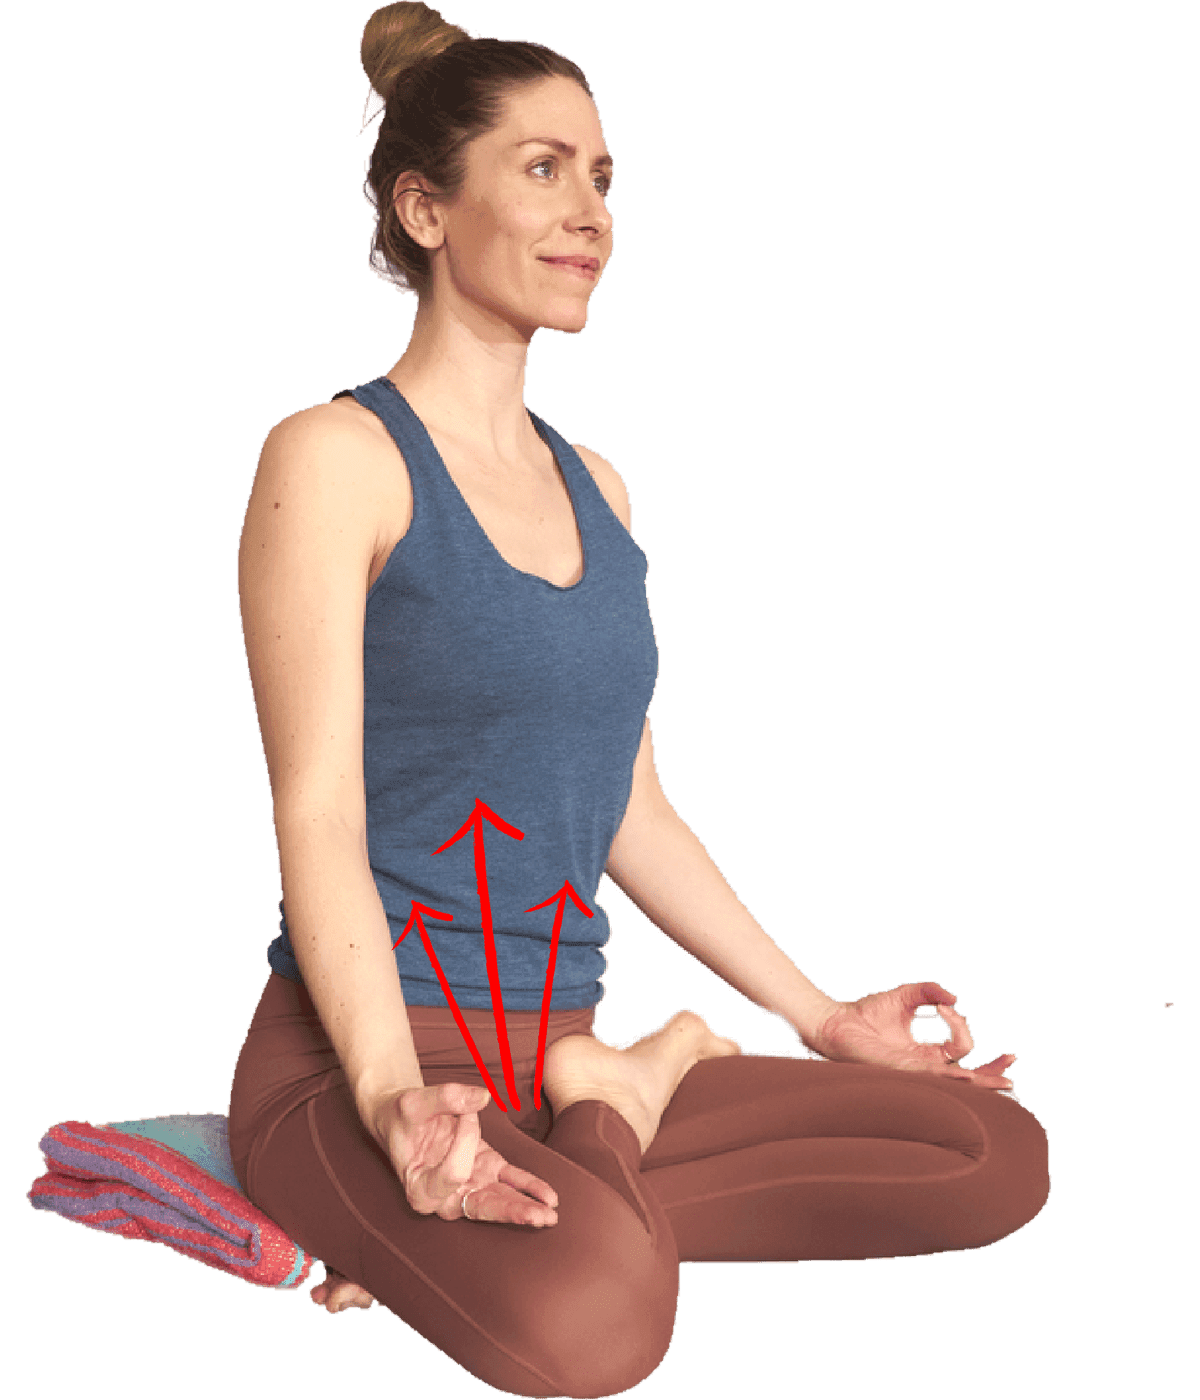
Up and in. The direction the cue always asks for.
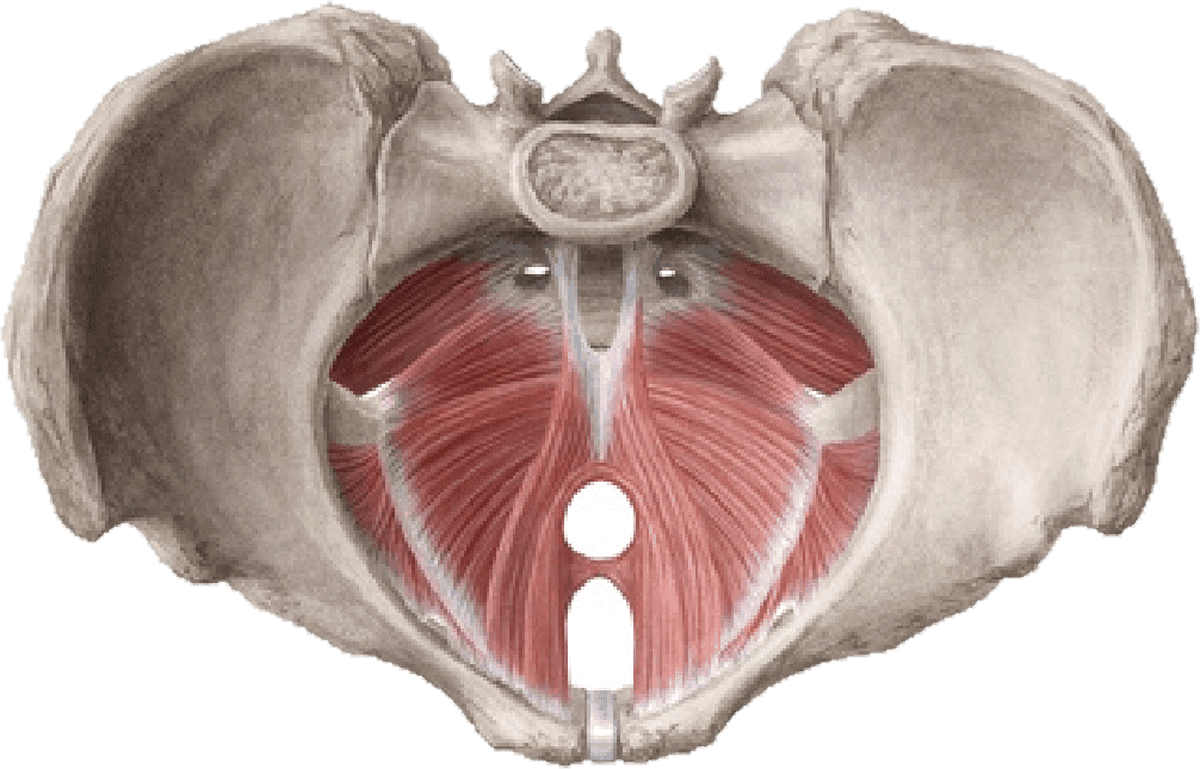
The hammock itself. For a good number of people, it's already gripping.
And you might think, "Great, I go to yoga and get all stretchy and toned, and also walk away with the ability to have better orgasms!" But actually, this isn't how it works for everyone.
A significant portion of the population has overly tight, overly active pelvic floor muscles. In order for their pelvic floor to function optimally, this part of the population actually needs to stretch and relax their pelvic floor — not strengthen and tighten it. The useful direction for them is down and out, not up and in.
Making it tighter could lead to problems like incontinence and leaking, back pain, pelvic pain and painful sex, along with all the other things associated with pelvic floor dysfunction.
There's something else worth knowing about this particular cue, which is that it's very hard to check. A great many people can't reliably produce a correct pelvic floor contraction when they're asked to, and a great many are wrong about whether they're doing it right. Nobody gets any feedback either way. So when you tell a room to engage their pelvic floor, a good number of them are not doing what you think they're doing, don't know it, and have no way of finding out — while some of them are gripping muscles that are already gripping.
That's a strange price for a cue given absent-mindedly forty times a class.
Give it once, deliberately, with instruction on how to release afterwards. Or don't give it at all. And if you know you have an overactive pelvic floor, or you're just not sure, this is a good one to let pass you by.
Yoga Is About Bringing Harmony to Body and Mind
Remember this when teachers give the 10 cues on this list — especially the ones you know don't work for you.
None of this makes your teacher a bad teacher. Most of them were handed these cues by someone they trusted, in a training that predated most of the imaging research, and are passing them on in good faith. I did it too, for years, with full conviction.
What it does mean is that a cue is an offer, not an instruction. It's a starting point somebody worked out on a body that may or may not resemble yours, and you are allowed to test it and find that it doesn't fit. Your feet turn out. Your arms are long. Your shin sits at 45 degrees and always will.
The one question worth carrying into your next class is small and answerable: does this cue take me toward my neutral, or away from it? You'll usually know within a breath.
Never feel like you have to follow every single cue your yoga teacher gives. And if they get upset with you for ignoring an outdated cue your skeleton can't perform, then you've learned something useful about the teacher rather than about your body.